Aim: To learn the process of bacterial conjugation through the transfer of genes, coding for antibiotic resistance.
Principle: Transfer of genetic material from one bacterial strain (donor) to another strain (recipient) is a common event that occurs in nature with the objective of mixing the gene pool, in otherwise asexually reproducing organisms. DNA transfer among bacteria is mediated in three ways viz., transfection, transduction and conjugation. Conjugation is the most widespread process of transferring genetic material from one bacterial cell to another. It is a process in which unidirectional transfer of DNA is mediated by conjugal plasmids or conjugal transposons requiring cell-to-cell contact. It was discovered by
Lederberg and Tatum in 1946.
Conjugation is best understood by considering properties of the 'F'factor, which is a small circular plasmid DNA that can replicate autonomously in the cell or can integrate into the host chromosome and thus transfer host chromosomal markers. When individual cells with an integrated 'F' are isolated and allowed to form pure colonies, the resulting strain can transfer chromosomal markers at very high frequency and are termed Hfr strains.
Materials Provided:
The list below provides information about the materials supplied in the kit. The products should be stored as suggested. Use the kit within 6 months of arrival.
Materials Required:
Equipment: Incubator, Shaker (37°C), Spectrophotometer.
Glassware: Conical-Flasks, Petri plates, Pipettes, Spreader, Test tubes.
Reagent: Distilled water.
Other Requirements: Cuvette (of 1 cm path length)
Micropipette, Tips.
Note:
Read the entire procedure before-starting the experiment.
All microbiological operations should be done strictly under aseptic conditions.
Revive the strains as soon as the lyophilized vial is opened.
Carry out the experiments within 2 weeks of reviving the strains.
For preparation of media and antibiotic, refer appendix. Bacterial Conjugation
Distinguishing characteristics of conjugation:
ONA transfer requires cell-cell contact.
DNA transfer occurs via a conjugal pore – resistant to DNase.
DNA transfer occurs in one direction - from donor to recipient and not vice versa.
DNA transfer does not require protein synthesis in donor cell.
DNA transfer requires energy in donor cell – primarily ATP.
Appendix:
Preparation of LB Broth/Agar (1 litre): Dissolve 25 g of media in 800 ml of distilled water. Adjust the pH to 7.0 with 5N NaOH (if necessary) and make up the volume to 1000 ml. Sterilize by autoclaving.
For LB agar, add 1.5% agar and autoclave.
Preparation of antibiotic:
Tetracycline: Dissolve 45 mg of tetracycline supplied in 1.5 ml of 70% ethanol, vortex if necessary. This gives a stock concentration of 30 mg/ml. Cover the vial with aluminium foil and store at 4°C. Use the antibiotic solution within 2 weeks. Add this antibiotic solution to LB media at a concentration of 30 mg/ml.
Streptomycin: Dissolve 150 mg of streptomycin supplied in 1.5 ml of sterile water, vortex if necessary. This gives a stock concentration of 100 mg/ml. Cover the vial with
aluminium foil and store at 4°C. Use the antibiotic solution within 2 weeks. Add this antibiotic solution to LB media at a concentration of 100 mg/ml.
Following aliquots of media are required for single conjugation experiment. (Excludes preparation of media for revival of strain).
• LB Broth 6 ml
• LB Broth + Tetracycline 6 ml + 25 ml
• LB Broth + Streptomycin 6 ml + 25 ml
• LB Agar + Tetracycline 60 ml
• LB Agar + Streptomycin 60 ml
• LB Agar + Tet. + Strep. 60 ml
Note: Prepare 25 ml LB Broth in a 100 ml conical flask.
Procedure:
Day 1: Revival of parental strains.
1. Break open one set of lyophilized vials (donor & recipient E. coli strains). Rehydrate each vial with 0.1 ml of sterile LB broth.
2. Streak the donor strain on LB plate with tetracycline (concentration 30 //g/ml),and the recipient strain on LB with streptomycin (concentration 100 //g/ml). (Streak in duplicates).
3. Incubate the plates at 37°C overnight.
Note: Store the revived plates at 4°C,and use within 2 weeks to carry out 5 experiments
in case of KT45.
Day 2:
4. Pick single colony each from the donor and recipient plate and inoculate into 6 ml LB broth containing the respective antibiotic.
5. Incubate at 37°C in a shaker overnight.
Day 3: Conjugation
6. Inoculate 1 ml of overnight donor culture into 25 ml LB broth (in 250 ml conical flask) with tetracycline at a concentration of 30 //g/ml.
7. Incubate at 37°C in a shaker.
8. Inoculate 3 ml of overnight recipient culture into 25 ml LB broth (in 250 ml conical flask) with streptomycin at a concentration of 100//g/ml.
9. Incubate at 37°C in a shaker.
10. Grow recipient and donor cultures till the O.D. of the donor culture reaches 0.8 - 0.9 at A600.
11. Take 0.2 ml each of donor and recipient cultures in a sterile cotton plugged test tube for conjugation. Label this as conjugated sample.
12. Gently mix and incubate in an incubator at 37°C for 11/2hr-2hrs.
13. Pipette 0.2 ml each of donor and recipient cultures into two different test tubes and Incubate at 37°C for 11/2 hrs.
14. Add 2 ml of sterile LB into each tube after 11/2, hours of incubation.
15. Incubate the tubes at 37°C for another 11/2 hrs.
Note: Do not place the tubes in a shaker during conjugation or subsequent incubation
Period.
16. Spread plate 0.1 ml of each of the samples (donor, recipient, conjugated sample) on antibiotic plates as indicated in the table.
17. Incubate the plates at 37°C overnight.
Observation: Tabulate your observations as follows for each experiment:
Note: Denote positive on observing bacterial growth and negative on seeing no growth.
Interpretation:
From the observations, one can interpret that:
Donor (Tef) and the recipient (Strep') grow only on those antibiotic plates to which they are resistant.
Donor and Recipient being sensitive to Streptomycin and Tetracycline respectively will not grow on those antibiotic plates.
Conjugated sample grow on Tetracycline and Streptomycin LB plate. This is because there is gene transfer of antibiotic resistance from F factor of donor to recipient via the process of conjugation. On the other hand, both the parental strains do not grow on the double antibiotic plate as it contains one or the other antibiotic to which they are sensitive.Bacterial lawn is also seen on plating conjugated sample on the individual antibiotic plates.
Thursday, April 19, 2007
Counter current immunoelectrophoresis
AIM: To check antisera for the presence and specifity of antibodies for a particular antigen by Counter current immunoelectrophoresis.
INTRODUCTION
Counter current immunoelectrophoresis (CCIEP) is a rapid version of Ouchterlony double diffusion (ODD) technique. The technique is used to check antisera for the presence and specificity of antibodies for a particular antigen.
PROCEDURE
Prepare10 ml of 1.5% agarose(0.15g/10ml) in 1X reservoir buffer by adding dry agarose to the buffer and heating slowly to dissolve the agarose completely.
Mark the end of the slide that will be towards positive electrode during the electrophoresis.
Place the slide on a leveled tabletop and quickly pipette 7ml agarose onto 50X75mm slide, spreading while releasing the agarose. Allow solidifying for 15min.
Place the gel plate on the template holder and fix it for CCIEP. Punch 3mm wells with the gel punch at position indicated for CCIEP.
Place the slide in electrophoresis tank and fill the tank with buffer.
Add 10 l of antigen in the four wells towards –ve electrode and 10 l of positive control antiserum and three test antisera in wells towards positive electrode.
Apply 50v and allow the electophoresis to continue for about 45 min.
Observe for precipitin line between the antigen and antisera wells.
Observation:
Here, pattern shows precipitin line between antigen and antisera wells.
INTERPRETATION
Precipitin line indicates the presence of antibody the antigen in the test sera.
The presence of more than one precipitin lines indicate the heterogenicity of the antibody for the antigen in the test sera.
The absence of the precipitin line indicates the absence of any antibody for the antigen in the test sera
Immuno histochemistry
Aim: To perform staining of tissue sections using antibodies (immuno histochemistry)
Principle: Antigen - antibody interactions form the basis of several techniques used in modern day scientific research and in routine clinical diagnosis. One such technique immunohistochemistry is used for the localization of an antigen in a cell or tissue using a specific antibody. The antibody binds specifically to the antigen present in the cell and the antigen-antibody complex is detected using an enzyme - linked secondary antibody. Addition of the substrate for the enzyme forms an insoluble colored precipitate in the tissues and allows localization of antigens.In Immunohistochemistry, sections of fixed, paraffin embedded tissue of interest are taken on glass slides. Fixation preserves the morphology of the cells/tissues as well as keeps the antigen from degrading. Paraffin has to be removed in order to allow the antibody to penetrate the tissue cells and bind to the antigen. This is achieved by using xylene. Antibodies are liquids and will not bind to the antigen unless the dry sections are hydrated. Hence the need to gradually introduce water in the cells of the tissues through grades of alcohol. Phosphate Buffered Saline (PBS) maintains the physiological pH ideal for any antigen-antibody reaction. The blocking step avoids any non-specific binding of the primary antibody. Most tissues express the enzyme Horse Radish Peroxidase endogenously. Hence H2O2. PBST and PBS washes remove excess of unbound antibody (Primary/Secondary) and maintain the PH.
Procedure:
Day 1: Deparafinizing, rehydrating and blocking
Deparaffinize the sections by placing the slide in Coplin jar with xylene for 10 minutes.
Transfer to a second Coplin jar of Xylene and keep the slides for 10 minutes.
Rehydrate the sections by passing the slide through various grades of alcohol viz. Absolute, 90%, 80% and 70% for 10 minutes in each jar.
Dip the sections in 1X PBS.
Place the slide in a moist chamber with sections facing upwards and cover each section with 100 µl of blocking serum. Incubate for 1 hour at room temperature (RT).
Rinse the slide in a jar of PBS.
Return slide to the moist chamber. Block endogenous peroxidase in the tissue sections by covering each of the sections with 100 l of freshly prepared mixture of methanol and 3% H2O2 in the ratio 4:1. (Add 200µl methanol to 50 µl 3% H2O2 in a 1.5 ml vial). Incubate for 30 minutes at RT.
Rinse the slide in a jar of fresh PBS.
Return slide to the moist chamber. To one section add 100µl of primary antibody. To the other section add 100 µl of negative control antibody. Incubate overnight at 4°C. (Cover the box and leave it in the refrigerator). Please note the orientation of the Sections in your observation book.
Day 2: Staining and mounting
Drain the antibody solutions on tissue paper. Place in a coplin iar with PBST. Wash 3 times with fresh PBST for 10 minutes each, followed by 3 washes in a fresh jar of PBS for 10 minutes each. (You may keep the coplin jar on a rocking platform).
Place the slide in the moist chamber. Add 100 pi of djjuted secondary antibody to each section and incubate for 1 hour at RT. (Do not exceed 1 hour incubation. It can increase non-specific reaction).
Transfer the slide to fresh PBST and wash for 10 minutes. Give 3 washes of 10 minutes each, followed by 3 washes with PBS of 10 minute each.
Wipe excess PBS around the sections. Keep the slide on a flat surface. Add 100 µl of substrate to each section and observe for colour development. (Do not exceed 10 minutes. Avoid exposure to direct light).
Stop the reaction by placing the slide in a jar of PBS.
Counter stains the sections by adding 100 µl of Hematoxylin to each section for 30 seconds.
Wash the slide under slow running tap water for 5 minutes by placing them in a coplin jar.
Dehydrate the sections by passing them through increasing grades of alcohol viz., 70% alcohol, 80% alcohol, 90% alcohol and absolute alcohol for 10 minutes in each.
Clear the sections by placing them in a jar of Xylene for 10 minutes.
Transfer to a second jar of Xylene for 10 minutes.
Mount the sections by placing a drop of DPX mountant on them and slowly dropping a coverslip on it (no air bubbles should be present).
Allow drying for half an hour.
Observe the staining under a light microscope.
Observation:
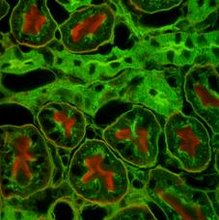
Observe the staining pattern of epithelial cells in both the sections and note the differences. The margins of epithelial cells show brown staining with primary antibody. Negative control antibody does not show this pattern. Nuclei of all cells stain blue with Hematoxylin.
Interpretation:
In the section stained with the primary antibody, the margins of most of the epithelial cells are stained brown indicating the presence of the antigen in the membranes of epithelial cells. This staining pattern is not observed in the section stained with the negative control antibody. The primary antibody specifically localizes the antigen present in the membranes of epithelial cells.
Principle: Antigen - antibody interactions form the basis of several techniques used in modern day scientific research and in routine clinical diagnosis. One such technique immunohistochemistry is used for the localization of an antigen in a cell or tissue using a specific antibody. The antibody binds specifically to the antigen present in the cell and the antigen-antibody complex is detected using an enzyme - linked secondary antibody. Addition of the substrate for the enzyme forms an insoluble colored precipitate in the tissues and allows localization of antigens.In Immunohistochemistry, sections of fixed, paraffin embedded tissue of interest are taken on glass slides. Fixation preserves the morphology of the cells/tissues as well as keeps the antigen from degrading. Paraffin has to be removed in order to allow the antibody to penetrate the tissue cells and bind to the antigen. This is achieved by using xylene. Antibodies are liquids and will not bind to the antigen unless the dry sections are hydrated. Hence the need to gradually introduce water in the cells of the tissues through grades of alcohol. Phosphate Buffered Saline (PBS) maintains the physiological pH ideal for any antigen-antibody reaction. The blocking step avoids any non-specific binding of the primary antibody. Most tissues express the enzyme Horse Radish Peroxidase endogenously. Hence H2O2. PBST and PBS washes remove excess of unbound antibody (Primary/Secondary) and maintain the PH.
Procedure:
Day 1: Deparafinizing, rehydrating and blocking
Deparaffinize the sections by placing the slide in Coplin jar with xylene for 10 minutes.
Transfer to a second Coplin jar of Xylene and keep the slides for 10 minutes.
Rehydrate the sections by passing the slide through various grades of alcohol viz. Absolute, 90%, 80% and 70% for 10 minutes in each jar.
Dip the sections in 1X PBS.
Place the slide in a moist chamber with sections facing upwards and cover each section with 100 µl of blocking serum. Incubate for 1 hour at room temperature (RT).
Rinse the slide in a jar of PBS.
Return slide to the moist chamber. Block endogenous peroxidase in the tissue sections by covering each of the sections with 100 l of freshly prepared mixture of methanol and 3% H2O2 in the ratio 4:1. (Add 200µl methanol to 50 µl 3% H2O2 in a 1.5 ml vial). Incubate for 30 minutes at RT.
Rinse the slide in a jar of fresh PBS.
Return slide to the moist chamber. To one section add 100µl of primary antibody. To the other section add 100 µl of negative control antibody. Incubate overnight at 4°C. (Cover the box and leave it in the refrigerator). Please note the orientation of the Sections in your observation book.
Day 2: Staining and mounting
Drain the antibody solutions on tissue paper. Place in a coplin iar with PBST. Wash 3 times with fresh PBST for 10 minutes each, followed by 3 washes in a fresh jar of PBS for 10 minutes each. (You may keep the coplin jar on a rocking platform).
Place the slide in the moist chamber. Add 100 pi of djjuted secondary antibody to each section and incubate for 1 hour at RT. (Do not exceed 1 hour incubation. It can increase non-specific reaction).
Transfer the slide to fresh PBST and wash for 10 minutes. Give 3 washes of 10 minutes each, followed by 3 washes with PBS of 10 minute each.
Wipe excess PBS around the sections. Keep the slide on a flat surface. Add 100 µl of substrate to each section and observe for colour development. (Do not exceed 10 minutes. Avoid exposure to direct light).
Stop the reaction by placing the slide in a jar of PBS.
Counter stains the sections by adding 100 µl of Hematoxylin to each section for 30 seconds.
Wash the slide under slow running tap water for 5 minutes by placing them in a coplin jar.
Dehydrate the sections by passing them through increasing grades of alcohol viz., 70% alcohol, 80% alcohol, 90% alcohol and absolute alcohol for 10 minutes in each.
Clear the sections by placing them in a jar of Xylene for 10 minutes.
Transfer to a second jar of Xylene for 10 minutes.
Mount the sections by placing a drop of DPX mountant on them and slowly dropping a coverslip on it (no air bubbles should be present).
Allow drying for half an hour.
Observe the staining under a light microscope.
Observation:
Observe the staining pattern of epithelial cells in both the sections and note the differences. The margins of epithelial cells show brown staining with primary antibody. Negative control antibody does not show this pattern. Nuclei of all cells stain blue with Hematoxylin.
Interpretation:
In the section stained with the primary antibody, the margins of most of the epithelial cells are stained brown indicating the presence of the antigen in the membranes of epithelial cells. This staining pattern is not observed in the section stained with the negative control antibody. The primary antibody specifically localizes the antigen present in the membranes of epithelial cells.
Rocket immuno-electrophoresis (RIEP)
Aim: To perform rocket immuno-electrophoresis (RIEP) for the determination of various concentration of antigen in given unknown sample.
Principle: Rocket Immunoelectrophoresis (RIEP) also known, as electro-immuno diffusion is a simple, quick and reproducible method for determining the concentration of antigen (Ag) in an unknown sample. Various concentrations of antigen are loaded side by side in small circular wells along the edge of an agarose gel that contains the specific antibody (Ab). On electrophoresis, the antigen begins to migrate towards the anode and interacts with antibody molecules to form a soluble antigen-antibody complex. However, as the samples electrophorese farther through the gel, more antibody molecules are encountered that interact with the antigen and when the "equivalence point" is reached, the Ag-Ab complex precipitates. This precipitin line is seen in the form of a rocket.
Higher the amount of antigen loaded in the well, farther the antigen will travel through the gel. Hence, with increasing antigen concentration, a series of rockets of increasing heights are seen that is proportional to amount of antigen in the well. Therefore, a direct measurement of the height of rocket will reflect upon the antigen concentration. A standard graph of antigen concentration versus peak height is then constructed and from the peak height of the unknown sample, concentration of antigen is determined.
Material Required: Conical flask, measuring cylinder, alcohol, distilled water, micro pipette, micro tips
Material provided:
Standard antigen: BSA A: 0.0125 mg/ml
B: 0.25 mg/ml
C: 1mg/ml
Antiserum: Goat anti BSA
Procedure:
1. Prepare 10 ml of 1.0% agarose (0.1 g/10 ml) in 1X electrophoresis buffer by heating slowly till agarose dissolves completely. Take care not to scorch or front the solution.
2. Allow the molten agarose to cool to 55°C.
3. Add 1 ml of antiserum to 10 ml of agarose solution. Mix gently, ensure uniform distribution of antiserum.
4. Pour the mix onto a glass plate placed on a horizontal surface and allow it to gel/solidify.
5. Place the glass plate on the template holder provided (in ETS-2) and fixes the RIEP template.
6. Punch 3 mm wells with gel puncher towards one edge of the plate.
7. Place the glass plate in the electrophoresis tank; ensure that the wells are towards the cathode.
8. Fill the tank with 1X electrophoresis buffer till it covers the gel.
9. Connect the power cord to the electrophoretic power supply according to the convention: Red: anode and Black: cathode.
10. Add 10/71 each of the given standard antigen and test antigen to the wells. Loading of wells should be carried out quickly to minimize diffusion from the well.
11. Electrophoreses the samples at 100 volts, till the rockets are visible or the dye front reaches the edge. This generally takes 1 to 11/^ hours. Electrophoresis can be continued for an additional 15 minutes after the dye has run out of the gel. This ensures better visibility of the precipitation peaks.
12. Stop electrophoresis; remove the glass plate from the electrophoresis tank.
13. Observe the precipitation peak or rocket formed against a dark background. If the rockets are still not clear; incubate the plate in a moist chamber at room temperature for 1 hour to overnight.
14. Measure the rocket height from the upper edge of the well to the tip of the rocket. Record your observations as in table 1.
15. Construct a standard graph by plotting the height of the rocket on Y-axis (linear scale) against the concentration of antigen on X-axis (log scale) on a semi-log graph sheet.
16. Determine the concentration of antigen in the test sample by reading the concentration against the rocket height from the standard graph.
Observation:
Result and discussion:
Initially the gel is prepared in given 1xPBS buffer add and adequate amount of anti serum to that and spread it on a plate and allow it to settle than make wells and to each well add the adequate quantity of the standard and test antigen then allow the gel to run through electrophoresis at 100 Volts up to 1 hour. A pattern of rocket is observed. Put the result in the table and plot the graph using the observed result. From the graph calculate the concentration of unknown. From the graph concentration of unknown test sample 1 and2 is found to be 0.81 and 0.75 mg/ml respectively.
Radial immunodiffusion technique for the quantitative analysis of the given antigen
Aim :- Radial immunodiffusion technique for the quantitative analysis of the given antigen.
Principle:Single radial immunodiffusion (RID) is used extensively for the quantitative estimation of antigens. The antigen-antibody precipitation is made more sensitive by the incorporation of antiserum in the agarose. Antigen (Ag) is then allowed to diffuse from wells cut in the gel in which the antiserum is uniformly distributed. Initially, as the antigen diffuses out of the well, its concentration is relatively high and soluble antigen-antibody adducts are formed. However, as Ag diffuses farther from the well, the Ag-Ab complex reacts with more amount of antibody resulting in a lattice that precipitates to form a precipitin ring. (Refer fig. 1).
Thus, by running a range of known antigen concentrations on the gel and by measuring the diameters of their precipitin rings, a calibration graph is plotted. Antigen concentrations of unknown samples, run on the same gel can be found by measuring the diameter of precipitin rings and extrapolating this value on the calibration graph.
Materials Required:
Glassware: Conical flask, Measuring cylinder.
Reagents : Alcohol, Distilled water.
Other Requirements : Micropipette, Tips, Moist chamber (box with wet cotton).
Note:
Read the entire procedure before starting the experiment.
· Dilute required amount of 10X assay buffer to 1X with distilled water.
· Reconstitute the antigen vials (standard and test) with 0.35 ml of 1X assay buffer. Mix well and store at 4°C.Use within 3 months.
· Reconstitute antiserum vial with 2 ml of 1X assay buffer. Mix well and store at 4°C. Use within 3 months.
· Wipe the glass plate with alcohol thoroughly to make it grease free for even spreading of agarose.
· Cut the wells neatly without rugged margins to get a perfect ring of precipitation.
· Add the antiserum to agarose only after it cools to 55°C. Higher temperature will inactivate the antibody.
· Assay buffer: Phosphate buffered saline.
Procedure:
1. Prepare 10 ml of 1.0% agarose (0.1 g/10ml) in 1X assay buffer by heating slowly till agarose dissolves completely. Take care not to scorch or froth the solution.
2. Allow the molten agarose to cool to 55°C.
3. Add 120 ml of antiserum to 6 ml of agarose solution. Mix by gentle swirling for uniform distribution of antibody.
4. Pour agarose solution containing the antiserum onto a grease free glass plate set on a horizontal surface. Leave it undisturbed to form a gel
5. Cut wells using a gel puncher as shown in figure 2, using the template provided.
6. Add 20 ml of the given standard antigens and test antigens to the wells.
7. Keep the gel plate in a moist chamber (box containing wet cotton) and incubate overnight at room temperature.
8. Mark the edges of the circle and measure the diameter of the ring. Note down your observations.
9. Plot a graph of diameter of ring (on Y-axis) versus concentration of antigen (on X- axis) on a semi-log graph sheet.
10. Determine concentration of unknown by reading the concentration against the ring diameter from the graph.
Observation:
Result: Initially, an agarose gel was prepared in 1x buffer and dilutions of antigens and antiserum were prepared as per the kit manuals given and antiserum was mixed with the gel and throughout the gel it is well spread. Against this antisera antigens.
Standard antigen A, B, C, D of the concentration (0.25 ,0.5,1.0,2.0mg/ml) and two test antigen 1 and 2 were allowed to diffuse overnight in humid chamber and the ring pattern as shown in the printout attached. The diameter of these ring were measured and graph of the concentration of the antigen Vs the diameter of the ring is plotted on a semi log graph paper and from this standard plot the concentration of unknown was measured by extrapolating the lines from the graph. from the graph the concentration of the unknown is found to be test sample 1-2 1.23 mg/ml and 1.52 mg/ml respectively.
Competitive ELISA.
Aim: To determine concentration of antigen by antigen capture ELISA or competitive ELISA.
Principle: ELISA or enzyme linked immunosorbent assay is a sensitive laboratory method used to detect the presence of antigens (Ag) or antibodies (Ab) of interest in a wide variety of biological samples. These assays require an immunosorbent i.e., antigen or antibody immobilized on solid surface such as wells of microtitre plates or membranes.
Antigen capture ELISA method is the most useful immunosorbent assay for detecting antigen, since it is 2-5 fold more sensitive than those assays in which antigen is directly bound onto the solid phase. In this assay, constant and limiting amount of antibody is immobilized onto a solid support. A fixed amount of labeled antigen [i.e., antigen coupled with enzyme like Horse radish peroxidase (HRP), alkaline phosphatase (ALP) etc.] is added and allowed to compete with unlabeled antigen (standard or test sample) for the immobilized antibody. The amount of labeled antigen bound is then estimated by a suitable assay for the label. The amount of labeled antigen that binds is inversely proportional to the amount of unlabeled antigen in the reaction mixture. Thus, the estimate of label in the well decreases with increase in the antigen concentration in the standard or test sample.
Materials Required:
Glassware: Measuring cylinder, Test tubes.
Reagent: Distilled water.
Other Requirements: Blotting paper, Micropipette, Tips.
Note:
Read (he entire procedure before starting the experiment.
Bring all the buffers to room temperature before starting the assay.
Dilute only required amount of buffers to 1X with distilled water, before use.
Use 24 wells per experiment.
Reconstitute samples of antibody, standard antigen and test samples with distilled water; volume as mentioned on their respective labels. Store at 4°C and use within 3 months.
Blocking buffer: BSA in PBST.
Coating buffer: Carbonate bicarbonate buffer.
P6ST; Phosphate buffered saline - Tween.
Stop solution: Sulphuric acid.
Prepare the reagents as indicated below before starting each experiment:
Preparation of sample diluent: Take 1 ml of blocking buffer and make up the volume to 30'ml with 1X PBST. Use this to dilute standard antigen and HRP labeled antigen.
Preparation of dilutions of standard antigen: Concentration of reconstituted standard antigen is 1 mg/ml, dilute this to get a range of concentrations using sample diluent, as follows:
Dilutions Conc. Of Std. Antigen
20 µl of 1 mg/ml (stock) 40 µg/ml (a)
+ 480 µl of sample diluent
200 µl of (a) + 800 µl diluent 8µg/ml (b)
500 µl of (b) + 500 µl diluent 4 µg /ml (c)
500 µl of (c) + 500 µl diluent 2 µg/ml (d)
500 µl of (d) + 500 µl diluent 1 µg/ml (e)
500 µl of (e) + 500 µl diluent 0.5 µg/ml (f)
500 µl of (f) + 500 µl diluent 0.25 µg/ml (g)
500 µl of (g) + 500 µl diluent 0.125 µg/ml(h)
Preparation of working concentration of test samples: After reconstitution, dilute each test sample individually by mixing 10ml of the sample with 2 ml of sample diluent (Dilution is 200 times).
Preparation of Reagents:
Reagents Vol. to be Vol. of distilled
Taken water to be added
1oxtmb/h2o2 0.6ml 5.4ml
10X PBST 10ml 90ml
5X Stop solution 12 ml 48 ml
Procedure:
Day 1: Coating of wells with antibody
1. Concentration of reconstituted antibody is 0.1 mg/ml, dilute with coating buffer, i.e., mix 50 µl of stock with 4.95 ml of coating buffer, to get working concentration of 1 µg/ml.
2. Pipette 200 µI of diluted (1X) antibody into each microtitre well (24 wells). Tap or shake the wells to ensure that the antibody solution is evenly distributed over the bottom of each well.
3. Incubate the microtitre wells overnight at 4°C.
Day 2: Blocking the residual binding sites on the wells
4. Discard the well contents. Rinse the wells with distilled water three times,draining out the water after each rinse.
5. Fill each well with 200 µl of blocking buffer and incubate at room temperature for 1 Hour.
6. Rinse the wells three times (as in step 4) with distilled water. Drain out the water completely by tapping the wells on a blotting paper.
Addition of antigen to the wells
7. Prepare standard antigen dilutions as indicated page above.
8. Add 100µl of standard antigen, diluted test samples and PBST to the coated wells as indicated in fig 1 (in duplicates).
Addition of HRP labeled antigen
9. Prepare 1X HRP labeled antigen using sample diluent, i.e., mix 3 mI of the stock (1000X) with 3 ml of sample diluent.
10. Add 100 v\ of 1X HRP labeled antigen to all the wells.
11. Incubate at room temperature for 30 minutes.
12. Discard the well contents; fill the wells with 1X PBST, allow it to stand for 3 minutes,
discard the contents. Repeat this step two more times.
Addition of substrate and measurement of absorbance
13. Dilute required amount of 10X TMB/H2O2 (substrate) solution to 1X using distilled Water.
14. Add 200 µI of 1X substrate to each well.
15. Incubate at room temperature for 10 minutes.
16. Add 100 ml of 1X stop solution to each well.
17. Transfer the contents of each well to individual tubes containing 2 ml of 1X stop solution.
18. Prepare substrate blank by adding 200//t of 1X substrate solution to 2.1 ml of 1X stop solution.Read the absorbance at 450 nm after blanking the spectrophotometer with substrate blank and record the readings as follows:
Calculation of antigen concentration
1. Calculate the average Ag for each of the samples (standard and test)
2. Plot A450 values of standards (b to h) on Y axis (linear scale) versus the concentration of antigen in µg/ml on X axis (log scale) on a semi-log graph sheet.
3. From the standard curve, determine the concentration of antigen in each of the test samples.
4. Calculate the concentration of antigen in, mg/ml, in each of the test samples as follows:
Concentration of antigen in the sample
= Concentration in µg/ml (from the graph) X Dilution factor
103
T1= 1.8 mg/ml
Result:From the standard curve, report the concentration of antigen in each of the test samples as follows:
Sandwich ELISA
Aim: To determine concentration of antigen by Sandwich ELISA method.
Principle: ELISA or enzyme linked immunosorbent assay is a sensitive laboratory method used to detect the presence of antigens (Ag) or antibodies (Ab) of interest in a wide variety of biological samples. These assays require an immunosorbent i.e., antigen or antibody immobilized on solid surface such as wells of microtitre plates or membranes.
In this method, two antibodies that can bind to two different epitopes on the same antigen are required. One of the antibodies s immobilized on a microtitre well and is referred to as capture antibody and the other antibody is labeled with a suitable enzyme [eg. (HRP), alkaline phosphatase (ALP) etc.] and is referred to as labeled antibody. Sample (standard and test) containing the antigen is allowed to react with the immobilized antibody. After the well is washed, labeled antibody is added and allowed to react with the bound antigen. Unreacted labeled antibody is washed out and the enzyme bound to solid support is estimated by adding a chromogenic substrate. The colour developed is measured spectrophotometrically, which is directly proportional to the antigen concentration.
Materials Required:
Glassware: Measuring cylinder, Test tubes.
Reagent: Distilled water.
Other Requirements: Blotting paper, Micropipette, Tips.
Prepare the reagents as indicated below before starting each experiment:
Preparation of sample diluent: Take 1 ml of blocking buffer and make up the volume to 30ml with 1X PBST. Use this to dilute standard antigen, test sample and HRP labeled antibody.
Preparation of dilutions of standard antigen: Concentration of reconstituted standard antigen is 0.4 mg/ml, dilute this to get a range of concentrations using sample diluent, as follows:
Dilutions Conc. Of Std. Antigen
10 µl of 0.4 mg/ml (stock) 800 ng/ml (a)
+ 5000 µl of sample diluent
500 µl of (a) + 500 µl diluent 400 ng/ml (b)
500 µl of (b) + 500 µl diluent 200 ng /ml (c)
500 µl of (c) + 500 µl diluent 100 ng/ml (d)
500 µl of (d) + 500 µl diluent 50 ng/ml (e)
500 µl of (e) + 500 µl diluent 25 ng/ml (f)
500 µl of (f) + 500 µl diluent 12.5 ng/ml (g)
500 µl of (g) + 500 µl diluent 6.25 ng/ml (h)
Preparation of working concentration of test samples: After reconstitution, dilute each test sample individually by mixing 2ml of the sample with 2 ml of sample diluent.
Preparation of Reagents:
Reagents Vol. to be Vol. of distilled
Taken water to be added
1oxtmb/h2o2 0.6ml 5.4ml
10X PBST 10ml 90ml
5X Stop solution 12 ml 48 ml
Note:
Bring all the buffers to room temperature before starting the assay.
Dilute only required amount of buffers to 1X with distilled water, before use.
Use 24 wells per experiment.
Reconstitute samples of antibody, standard antigen and test samples with distilled water; volume as mentioned on their respective labels. Store at 4°C and use within 3 months.
Blocking buffer: BSA in PBST.
Coating buffer: Carbonate bicarbonate buffer.
P6ST; Phosphate buffered saline - Tween.
Stop solution: Sulphuric acid.
Procedure:
Day 1: Coating of wells with antibody
1. Concentration of reconstituted antibody is 0.1 mg/ml, dilute with coating buffer, i.e., mix 50 µl of stock with 4.95 ml of coating buffer, to get working concentration of 1µg/ml.
2. Pipette 200 µI of diluted (1X) antibody into each microtitre well (24 wells). Tap or shake the wells to ensure that the antibody solution is evenly distributed over the bottom of each well.
3. Incubate the microtitre wells overnight at 4°C.
Day 2: Blocking the residual binding sites on the wells
4. Discard the well contents. Rinse the wells with distilled water three times, draining out the water after each rinse.
5. Fill each well with 200 µl of blocking buffer and incubate at room temperature for 1 Hour.
6. Rinse the wells three times (as in step 4) with distilled water. Drain out the water completely by tapping the wells on a blotting paper.
Addition of antigen to the wells
7. Prepare standard antigen dilutions.
8. Add 200µl of standard antigen, diluted test samples and PBST to the coated wells.
9. Incubate at room temperature for 30 minutes.
10. Discard the well contents, fill the wells with IX PBST,allow it to stand for 3 minutes, discard the contents.Repeat this step two more times.
Addition of HRP labeled antibody
11. Dilute 5 μl of 1000X Antibody-HRP conjugate with 5 ml of sample diluent to get 1X concentration.
12. Add 200 μl of 1X HRP labeled antibody to all the wells.
13. Incubate at room temperature for 30 minutes.
14. Discard the well contents and rinse the wells 3 times with 1X PBST. (As in step 10).
Addition of substrate and measurement of absorbance
15. Dilute required amount of 10X TMB/H2O2 (substrate) solution to 1X using distilled water.
16. Add 200 μl of 1X substrate to each well.
17. Incubate at room temperature for 10 minutes
18. Add 100 μl of 1X stop solution to each well.
19. Transfer the contents of each well to individual tubes containing 2 ml of 1X stop solution.,
20. Prepare substrate blank by adding 200μl or 1X substrate solution to 2.1 ml of 1X stop solution.
21. Read the absorbance at 450 nm after blanking the spectrophotometer with substrate blank, record your readings in observation table:
Calculation of antigen concentration in test sample:
22. Calculate the average A450 for each of the samples (standard and test)
23. Plot A450 of standards on Y axis (linear scale) versus the concentration of antigen in ng/ml on X axis (log scale) on a semi-log graph sheet. (Refer Fig 2).
24. From the standard curve, determine the concentration of antigen in the test samples.
Calculation:
Calculate the concentration of antigen in mg/ml, in each of the test samples as follows:
Concentration of antigen i the sample
= Concentration in ng/ml (from the graphic X Dilution factor
106
T1 = 2 X 10⁻³ mg/ml
Result:From the standard curve, report the concentration of antigen In each of the test samples as follows:
Subscribe to:
Posts (Atom)